-
[crawling] Selenium, BeautifulSoup을 이용한 크롤링 - 인터파크 여행지 크롤링Crawling 2020. 3. 22. 23:55

전체 코드는 깃허브에 있습니다! 👉 https://github.com/devAon/Web-Scraping
🔥목차🔥
🍓 1. 크롤링
🍓 2. 개발 환경 구축
🍓 3, 웹드라이버란?
🍓 4. Selenium 이란?
🍓 5. 웹 드라이버를 이용한 Selenium의 주요 API 습득
🍓 6. 크롤링 타겟 사이트 분석및 데이터 접근 실습🍓 7. Beautiful Soup의 이해 및 API 습득
🍓 8. 수집 데이터의 전처리 및 DB 처리🐥 예제 - 인터파크 해외여행지 정보 크롤링
1. 크롤링
크롤링이란?
웹 페이지를 그대로 가져와서 거기서 데이터를 추출해 내는 행위
머신러닝 영역 안에 빅데이터 처리 분석의 데이터 수집
selenium 과 Beautifulsoup을 이용해서 데이터 수집
- 크롤러크롤링 소프트웨어
파이참 Pycharm
파이썬 라이브러리 설치방법
Settings - Project Interpreter - +버튼 클릭 - 원하는 라이브러리 검색 후 설치
2. 개발 환경 구축
언어
- python.exe. 설치 (3.x)
모듈
- selenium 설치
$ pip install selenium
- bs4 설치
Selenium VS BeautifulSoup 차이
Selenium
BeautifulSoup은 사용자 행동을 특정해서 데이터를 가져올 수 없다.
사용자의 행동을 동적으로 추가하기 위해 Selenium이 필요하다.
공식문서 : https://selenium-python.readthedocs.io/
selenium-python.readthedocs.io
BeautifulSoup
HTML과 XML을 파싱하는데 사용되는 파이썬 라이브러리이다.
공식문서 : https://www.crummy.com/software/BeautifulSoup/bs4/doc/
www.crummy.com
웹 드라이버
- Chrome 드라이버 설치
https://chromedriver.chromium.org/downloads
Downloads - ChromeDriver - WebDriver for Chrome
WebDriver for Chrome
chromedriver.chromium.org
- Phantom 드라이버 설치
https://github.com/detro/ghostdriver
detro/ghostdriver
Ghost Driver is an implementation of the Remote WebDriver Wire protocol, using PhantomJS as back-end - detro/ghostdriver
github.com
에디터
- vs code 설치
- plugin 설치
vs code에서 ctrl + Shift + X - 아래 4가지 설치


3, 웹드라이버란?
- 자동화 설계
- 시나리오에 따른 움직임
4. Selenium 이란?
- 웹드라이버 띠우기
- 에이전트 조작
- 프록시 조작
Selenium Getting Started
from selenium import webdriver
from selenium.webdriver.common.keys import Keys

driver = webdriver.Firefox()
driver.get("http://www.python.org")
assert "Python" in driver.title
elem = driver.find_element_by_name("q")
elem.clear()
elem.send_keys("pycon")
elem.send_keys(Keys.RETURN)
assert "No results found." not in driver.page_source
driver.close()
(참고) https://selenium-python.readthedocs.io/getting-started.html
2. Getting Started — Selenium Python Bindings 2 documentation
2.2. Example Explained The selenium.webdriver module provides all the WebDriver implementations. Currently supported WebDriver implementations are Firefox, Chrome, IE and Remote. The Keys class provide keys in the keyboard like RETURN, F1, ALT etc. from se
selenium-python.readthedocs.io
잠시대기
명시적 대기 => 특정 요소가 발견될 때까지 대기
from selenium.webdriver.common.by import By
from selenium.webdriver.support.ui import WebDriverWait
from selenium.webdriver.support import expected_conditions as EC

try:
    element = WebDriverWait(driver, 10).until(
        EC.presence_of_element_located((By.ID, "myDynamicElement"))
    )
finally:
    driver.quit()
암묵적 대기 -> DOM이 다 로드 될 때까지 대기하고 먼저 로드되면 바로 진행
절대적 대기 -> time.sleep(10) -> 클라우드 페어 (디도스 방어 솔루션)
https://selenium-python.readthedocs.io/waits.html
5. Waits — Selenium Python Bindings 2 documentation
5. Waits These days most of the web apps are using AJAX techniques. When a page is loaded by the browser, the elements within that page may load at different time intervals. This makes locating elements difficult: if an element is not yet present in the DO
selenium-python.readthedocs.io
5. 웹 드라이버를 이용한 Selenium의 주요 API 습득
- 페이지 접속
- 우회 접속
- 로그인및 검색 등 폼처리
- 찾기
- 추출하기
6. 크롤링 타겟 사이트 분석및 데이터 접근 실습
- search- result
- rotation
- selenium의 최대치
7. Beautiful Soup의 이해 및 API 습득
- when?
- DOM 접근
- 콘텐츠 획득
8. 수집 데이터의 전처리 및 DB 처리
- 디비 접속 처리
- sql 처리
- 크롤링 데이터 삽입
인터파크 해외여행지 정보 크롤링
Interpark_travel_scraping.py
-Selenium
-BueatifulSoup
# 인터파크 투어 사이트에서 여행지를 입력후 검색 -> 잠시후 -> 결과
# 로그인시 PC 웹 사이트에서 처리가 어려울 경우  -> 모바일 로그인 진입
# 모듈 가져오기
# pip install selenium
# pip install bs4
# pip install pymysql
from selenium import webdriver as wd
from bs4 import BeautifulSoup as bs
from selenium.webdriver.common.by import By
# 명시적 대기를 위해
from selenium.webdriver.support.ui import WebDriverWait
from selenium.webdriver.support import expected_conditions as EC
from DbMgr import DBHelper as Db
import time
from Tour import TourInfo

# 사전에 필요한 정보를 로드 => 디비혹스 쉘, 베치 파일에서 인자로 받아서 세팅
db       = Db()
main_url = 'http://tour.interpark.com/'
keyword  = '로마'
# 상품 정보를 담는 리스트 (TourInfo 리스트)
tour_list = []

# 드라이버 로드
# 맥용
# driver = wd.Chrome(executable_path='./chromedriver')
# 윈도우용
driver = wd.Chrome(executable_path='chromedriver.exe')
# 고스트용
# driver   = wd.PhantomJS(executable_path='./phantomjs')
# 차후 -> 옵션 부여하여 (프록시, 에이전트 조작, 이미지를 배제)
# 크롤링을 오래돌리면 => 임시파일들이 쌓인다!! -> 템프 파일 삭제

# 사이트 접속 (get)
driver.get(main_url)
# 검색창을 찾아서 검색어 입력
# id : SearchGNBText
driver.find_element_by_id('SearchGNBText').send_keys(keyword)
# 수정할경우 => 뒤에 내용이 붙어버림 => .clear() -> send_keys('내용')
# 검색 버튼 클릭
driver.find_element_by_css_selector('button.search-btn').click()

# 잠시 대기 => 페이가 로드되고 나서 즉각적으로 데이터를 획득 하는 행위는
# 명시적 대기 => 특정 요소가 로케이트(발결된때까지) 대기
try:
    element = WebDriverWait(driver, 10).until(
        # 지정한 한개 요소가 올라면 웨이트 종료
        EC.presence_of_element_located( (By.CLASS_NAME, 'oTravelBox') )
    )
except Exception as e:
    print( '오류 발생', e)
# 암묵적 대기 => DOM이 다 로드 될때까지 대기 하고 먼저 로드되면 바로 진행
# 요소를 찾을 특정 시간 동안 DOM 풀링을 지시 예를 들어 10 초이내 라로
# 발견 되면 진행
driver.implicitly_wait( 10 )
# 절대기 대기 => time.sleep(10) -> 클라우드 페어(디도스 방어  솔류션)
# 더보기 눌러서 => 게시판 진입
driver.find_element_by_css_selector('.oTravelBox>.boxList>.moreBtnWrap>.moreBtn').click()

# 게시판에서 데이터를 가져올때
# 데이터가 많으면 세션(혹시 로그인을 해서 접근되는 사이트일 경우) 관리
# 특정 단위별로 로그아웃 로그인 계속 시도
# 특정 게시물리 사라질 경우 => 팝업 발생 (없는 ...) => 팝업 처리 검토
# 게시판 스캔시 => 임계점을 모름!!
# 게시판 스캔 => 메타 정보 획득 => loop 를 돌려서 일괄적으로 방문 접근 처리

# searchModule.SetCategoryList(1, '') 스크립트 실행
# 16은 임시값, 게시물을 넘어갔을때 현상을 확인차
for page in range(1, 2):#16):
    try:
        # 자바스크립트 구동하기
        driver.execute_script("searchModule.SetCategoryList(%s, '')" % page)
        time.sleep(2)
        print("%s 페이지 이동" % page)
        #############################################################
        # 여러 사이트에서 정보를 수집할 경우 공통 정보 정의 단계 필요
        # 상품명, 코멘트, 기간1, 기간2, 가격, 평점, 썸네일, 링크(상품상세정보)
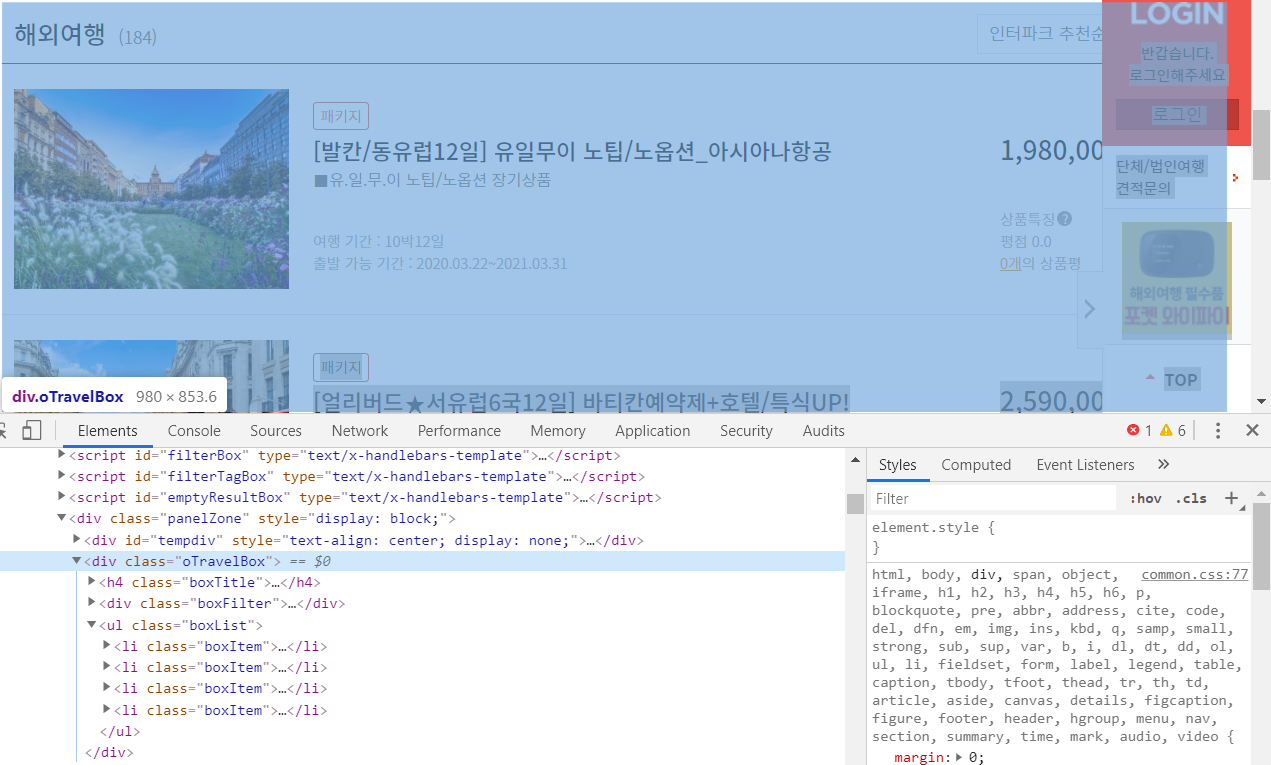
        boxItems = driver.find_elements_by_css_selector('.oTravelBox>.boxList>li')
        # 상품 하나 하나 접근
        for li in boxItems:
            # 이미지를 링크값을 사용할것인가?
            # 직접 다운로드 해서 우리 서버에 업로드(ftp) 할것인가?
            print( '썸네임', li.find_element_by_css_selector('img').get_attribute('src') )
            print( '링크', li.find_element_by_css_selector('a').get_attribute('onclick') )
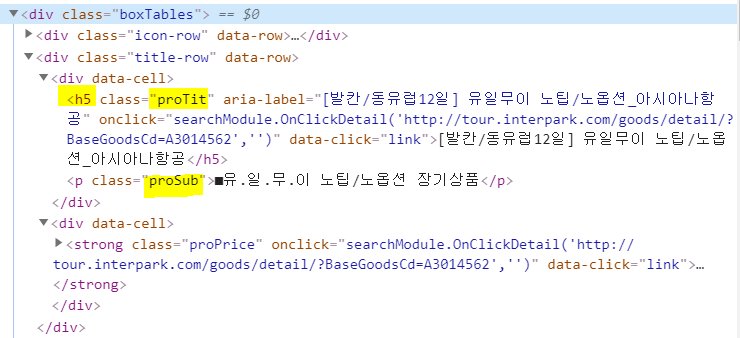
            print( '상품명', li.find_element_by_css_selector('h5.proTit').text )
            print( '코멘트', li.find_element_by_css_selector('.proSub').text )
            print( '가격',   li.find_element_by_css_selector('.proPrice').text )
            area = ''
            for info in li.find_elements_by_css_selector('.info-row .proInfo'):
                print(  info.text )
            print('='*100)
            # 데이터 모음
            # li.find_elements_by_css_selector('.info-row .proInfo')[1].text
            # 데이터가 부족하거나 없을수도 있으므로 직접 인덱스로 표현은 위험성이 있음
            obj = TourInfo(
                li.find_element_by_css_selector('h5.proTit').text,
                li.find_element_by_css_selector('.proPrice').text,
                li.find_elements_by_css_selector('.info-row .proInfo')[1].text,
                li.find_element_by_css_selector('a').get_attribute('onclick'),
                li.find_element_by_css_selector('img').get_attribute('src')
            )
            tour_list.append( obj )
    except Exception as e1:
        print( '오류', e1 )

print( tour_list, len(tour_list) )
# 수집한 정보 개수를 루프 => 페이지 방문 => 콘텐츠 획득(상품상세정보) => 디비
for tour in tour_list:
    # tour => TourInfo
    print( type(tour) )
    # 링크 데이터에서 실데이터 획득
    # 분해
    arr = tour.link.split(',')
    if arr:
        # 대체
        link = arr[0].replace('searchModule.OnClickDetail(','')
        # 슬라이싱 => 앞에 ', 뒤에 ' 제거
        detail_url = link[1:-1]
        # 상세 페이지 이동 : URL 값이 완성된 형태인지 확인 (http~)
        driver.get( detail_url )
        time.sleep(2)
        # pip install bs4
        # 혖재 페이지를 beautifulsoup 의 DOM으로 구성
        soup = bs( driver.page_source, 'html.parser')
        # 현제 상세 정보 페이지에서 스케줄 정보 획득
        data = soup.select('.tip-cover')
        #print( type(data), len(data), type(data[0].contents)  )
        # 디비 입력 => pip install pymysql
        # 데이터 sum
        content_final = ''
        for c in data[0].contents:
            content_final += str(c)

        # html 콘첸츠 데이터 전처리 (디비에 입력 가능토록)
        import re
        content_final   = re.sub("'", '"', content_final)
        content_final   = re.sub(re.compile(r'\r\n|\r|\n|\n\r+'), '', content_final)

        print( content_final )
        # 콘텐츠 내용에 따라 전처리 => data[0].contents
        db.db_insertCrawlingData(
            tour.title,
            tour.price[:-1],
            tour.area.replace('출발 가능 기간 : ',''),
            content_final,
            keyword
        )

# 종료
driver.close()
driver.quit()
import sys
sys.exit()
TourInfo.py
class TourInfo:
    title = ''
    price = ''
    area  = ''
    link  = ''
    img   = ''
    contents = ''

    def __init__(self, title, price, area, link, img, contents=None ):
        self.title = title
        self.price = price
        self.area  = area
        self.link  = link
        self.img   = img
        self.contents = contents
DBMgr.py
# 디비 처리, 연결, 해제, 검색어 가져오기, 데이터 삽입
import pymysql as my

class DBHelper:
    '''
    맴버변수 : 커넥션
    '''
    conn = None
    '''
    생성자
    '''
    def __init__(self):
        self.db_init()
    '''
    맴버 함수
    '''
    def db_init(self):
        self.conn = my.connect(
                        host='localhost',
                        user='root',
                        password='1234',
                        db='pythonDB',
                        charset='utf8',
                        cursorclass=my.cursors.DictCursor )

    def db_free(self):
        if self.conn:
            self.conn.close()

    # 검색 키워드 가져오기 => 웹에서 검색
    def db_selectKeyword(self):
        # 커서 오픈
        # with => 닫기를 처리를 자동으로 처리해준다 => I/O 많이 사용
        rows = None
        with self.conn.cursor() as cursor:
            sql  = "select * from tbl_keyword;"
            cursor.execute(sql)
            rows = cursor.fetchall()
            print(rows)
        return rows

    def db_insertCrawlingData(self, title, price, area, contents, keyword ):
        with self.conn.cursor() as cursor:
            sql = '''
            insert into `tbl_crawlingdata`
            (title, price, area, contents, keyword)
            values( %s,%s,%s,%s,%s )
            '''
            cursor.execute(sql, (title, price, area, contents, keyword) )
        self.conn.commit()

# 단독으로 수행시에만 작동 => 테스트코드를 삽입해서 사용
if __name__=='__main__':
    db = DBHelper()
    print( db.db_selectKeyword() )
    print( db.db_insertCrawlingData('1','2','3','4','5') )
    db.db_free()
필요한 데이터 수집을 위해 XML 분석


 반응형
반응형